|
I am using Paint
Sop Pro Version 9, I am reasonable sure it can be done
it other versions as well. Except version, you can
download the selections for v 7 below.
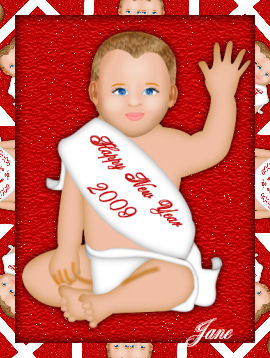
By Jane's Haven
Contact Us
Terms of Use
I am using
Selections, get them
Here.
Selections for
Version 7
here
You will also
need the eyes, ears, hair. get them
Here. |
|
Open all the images in PSP. |
| 1. Open a new transparent
image size; 330X440 pixels. |
| 2. Add a new layer and name it,
body, load from disk the, 01-body, flood fill with
color; #efbea4. Selections, float, add a cutout with the
settings below.
Vertical and Horizontal; 0
Opacity; 100
Blur; 22.00
Color; #764a0c
Deselect. |
| 3. Add new layer, name it,
head. load from disk the; 02-head selection, flood fill
with the same color as the body. Float selection and add
the same cutout. Deselect. |
| 4. Add new layer, name it,
eyes, load from disk the, 03-eyes, open the eyes
image, right click on the very top of the window and
click, copy. Go back to your main image and right click,
paste into selection, Deselect. |
| 5.Add new layer, name it, nose,
load from disk the, 04-nose selection, flood fill with,
#d08156. Deselect, go to adjust, blur, average, use a
setting of 3. |
| 6. Add new layer, name it,
upper lip, load from disk the, 05-upperlip, flood fill
with; #ffa2a2. Invert selection and add a drop shadow
with the following settings.
Vertical and Horizontal; 0
Opacity; 70
Blur; 3.00
Color; #e00c0c
Deselect. |
| 7. Add new layer, name it,
lower lip, flood fill with the same as the upper lip and
invert and add the same drop shadow. Deselect. |
| 8. Add new layer, name it, eye
brows, load the, 07-eyebrows selection and flood fill
with; #d87c04. Deselect. |
| 9.Add new layer, name it, face
shading, load the, 08-faceshading, flood fill with;
#b1500f and deselect. |
| 10.
Add new layer, name it, nose shading,
load the; 09-noseshading, flood fill with; #f6daca,
deselect. |
| 11.
Add new layer, name it, nose shading 2.
load from disk the; 10-noseshading2, flood fill with the
same color as in the last step and deselect. |
| 12.
Add new layer, name it, fore head
shading, load the; 11-foreheadshading, flood fill with
the same color; #f6daca and deselect. |
| 13,Add new layer, name it, face
shading 2, load the, 12-faceshading2, flood fill with
the same color as the last step and deselect.
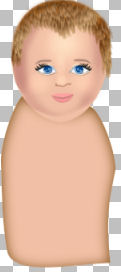
The body looks a
bit odd but not to worry it will be covered. |
| 14. Add new layer, name it,
hair, load the; 13-hair selection, open the baby hair
image, fight click on the top of the image, copy, back
to the main image right click on the very top and
choose, past into selection. Deselect. |
| 15. Add new layer, name it,
ears, load the; 14-ears selection, open the baby ears
image and copy, back to the main image to paste into
selection. Deselect. |
| 16. Add new layer, name it,
left leg, load the; 15-leftleg, flood fill with;
#efbea4. Invert selection and add a drop shadow using
the settings below.
Vertical and Horizontal; 0
Opacity; 100
Blur; 25.00
Color; #a96a0f
Deselect. |
| 17. Add new layer, name it,
left leg shading, load the; 16-leftlegshading, flood
fill with; #b86800, deselect. Go to adjust, blur,
average, use a setting of; 7. |
| 18. Add new layer, name it,
left foot, load the; 17-leftfoot, flood fill with;
#efbea4. Invert selection and add the following drop
shadow.
Vertical and Horizontal; 0
Opacity; 100
Blur; 18.00
Color; #a96a0f
Deselect. |
| 19. Add new layer, name it,
diaper 1, load the; 18-diaper1, flood fill with white.
Invert selection and add a drop shadow using the
settings below.
Vertical and Horizontal; 0
Opacity; 100
Blur; 18.00
Color; #808080
Deselect. |
| 20. Add new layer, name it,
right leg, load the; 19-rightleg, flood fill with;
#efbea4. Invert and add the same drop shadow as in step
16 and deselect. |
| 21. Add new layer, name it,
right leg shading, load the; 20-rightlegshading, flood
fill with; #b86800. Deselect, go to adjust, blur,
average, use a setting of; 7. |
| 22.New layer, name it, left
arm, load from disk the; 21-leftarm, flood fill with;
#efbea4. Invert ,add a drop shadow with the following
settings.
Vertical and Horizontal; 0
Opacity; 100
Blur; 20.00
Color; #a96a0f
Deselect. |
| 23.New layer, name it, left
hand shading, load from disk the; 22-lefthandshading,
flood fill with; #d87c04. Deselect and go to adjust,
blur, average, with a seeing of;5. |
| 23. Hi-light the
body layer, load the body selection again, flood fill
with; #efbea4 and deselect. On this same layer, load
the; 23-rightharm selection, food fill with the same
color. Now deselect, next, select all, float, defloat,
invert and add the following drop shadow.
Vertical and Horizontal; 0
Opacity; 80
Blur; 20.00
Color; #a96a0f
Deselect. |
| 24. Hi-light the right leg
layer, load the; 19-rightleg, once again flood fill
with; #efbea4, deselect and load from disk the;
24-rightfoot, flood fill using the same color. Now,
deselect, select all, float, defloat, invert and add a
drop shadow with the settings below.
Vertical and Horizontal; 0
Opacity; 80
Blur; 20.00
Color; #a96a0f
Deselect |
| 25. Staying on the same
layer, add a new layer, name it, right foot shading,
load the; 25-rightfootshading, flood fill with; #e59b59,
deselect. |
| 26. HI-light layer 17-leftfoot,
add a new layer, name it, left foot shading, load the;
26-leftfootshaing, flood fill with; #e59b59, deselect.
|
| 27. Hi-light the top layer and
add a new layer, name it, right toe 1, load from disk
the; 27-righttoe1, flood fill with; #efbea4. Float
selection and add a cutout with the following settings.
Vertical and Horizontal; 0
Opacity; 60
Blur; 7.00
Color; #a26002
Deselect. |
| 28. Add a new layer, name it,
right toe 2, load the; 28-righttoe2, flood fill with;
#efbea4. Float and add the same cutout as in the last
step. Deselect. We
are going to do two more right toes the same way.
Below are below are the selections, numbered and named
in order.
29-righttoe3
30-righttoe4
Complete each one before going
to the next selection, floating and adding the cutout. |
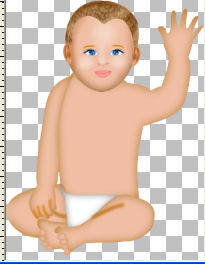
| 29. the next four layers are
the left toes, do the same for all four as we did for
all four of the right toes.
31-lefttoe1
32-lefttoe2
33-lefttoe3
34-lefttoe4
 |
| 30, Add new layer, name it,
banner back 1, load the; 35-bannerback1, flood fill with
white. Invert selection and add a drop shadow with the
settings below.
Vertical and Horizontal; 0
Opacity; 100
Blur; 8.00
Color; #808080
Deselect. |
| 31. Add new layer, name it,
banner back 2, load the; 36-bannerback2, flood fill with
white and invert, add the same drop shadow as the last
step. Deselect and go to adjust, brightness and
contrast, with the following settings, brightness; minus
33, contrast; 0. |
| 32. Add new layer, name it,
left banner back, load from disk the;
37-leftbannerback, flood fill with white. Invert
selection and add the same drop shadow as in the last
step, except, change the blur to; 6.00. Deselect. |
| 33. Add new layer. name it,
left banner back 2, load the; 38-leftbannerback2, flood
fill with white. Invert and add the same drop shadow as
in the last step. Deselect, go to adjust, bright and
contrast and use these settings, brightness; minus 33,
contrast; 0. In the layer palette, move this layer under
the left banner back. |
| 34. Hi-light the top layer, add
new layer, name it, diaper 2, load the; 39-diaper2
selection, flood fill with white. Invert and add the
following drop shadow.
Vertical and Horizontal; 0
Opacity; 100
Blur; 6.00
Color; #808080
Deselect. |
| 35. Add new layer, name it,
main banner, load the; 40-mainbanner, flood fill with
white. Invert and add a drop shadow using the settings
above, changing the blur to; 16.00. Deselect. |
| 36. Add one more layer, name it
text, load from disk, 41-text, flood fill with a color
of your choice. Deselect. New Year Baby is complete. |
|
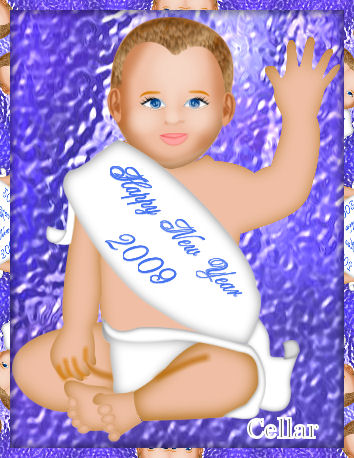
A Huge Thank you to Cellar for
testing this tut. Magnificent work, Cellar. |
