|
Broken Hearted
Memories Tag Tutorial
Paint Shop Pro
Tutorial
I used Version X
but I am reasonably sure it can be done in many other
versions as well.
by
Jane's Haven
Contact Us
Terms of Use
Files Needed
Plugins, Mura Meister Perspective,
download
Here
Alien skin, Xenofex for the sky. I have included in the
zip my sky file, if you don't have this filter.
My Brush Tip, You impost to your brush
folder, a tube, I have supplied the art of Zindy
S.D. Nielsen, it was a free tube, you can find her site
here, included
in the zip. You have to use her copyright on the tag.
Here is a tutorial on how to import brushes.
All the supplies can be found
HERE. |
| 1.Open new transparent image size,
600X60 pixels, flood fill with white. |
| 2. In the layer palette, add a new
layer, flood fill with t The Metallic Gradient using the
settings below.
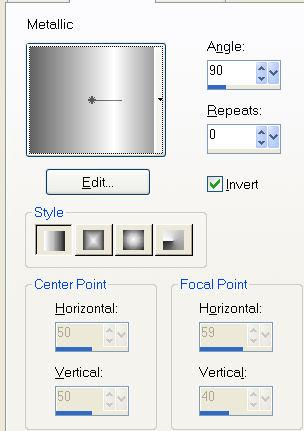 |
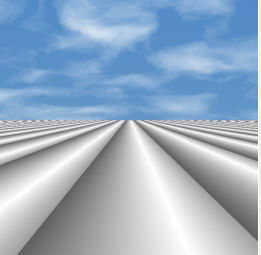
| 3, Go to effects, plugins, find
the Mura Meister perspective, when open use the settings
below
 |
| 4. Add a new layer, flood fill
with white, go to layer palette, arrange, move down.
** If you are
using the sky background included in the zip, do not add
a new layer, just copy and paste as a new layer and move
down.** Skip the instructions or the Xenoflex filter. |
| 5. Open the Alien Skin Xenofex
filter, Little Fluffy Clouds, use the settings below.
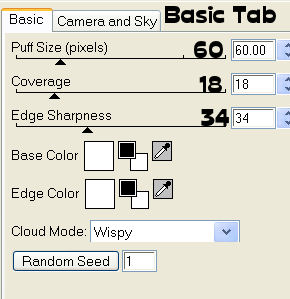 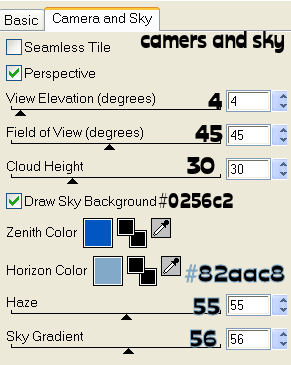
 |
| 6. In the layer palette, click on
the very top layer and add a new layer, we are going
to use the brush tool, click on the paint brush too.
Next, look at the bar on the bar at the top of your psp,
not open it and find the, JH-music3 brush, see below. In the Material Palette, make sure the top
color is white, than click on the left top of your
image. You should have what looks like music notes.
 |
| 7. Open the car provided,
copy and paste into the tag image, place it center and
push it all the way to the edge of the gradient
perceptive tile. |
| 8, Open the broken heart shape,
copy and paste it as a new layer on the tag image. Place
it down in the right corner. Add a drop shadow, with the
following settings.
H & V=2
Opacity=40
Blur=5.00
Color=Black |
| 9. Open the tube included in the
zip or use one of your own. Copy, got to the tag and
paste as a new layer, go to image, mirror. Image,
resize, 80%%, all layers, not checked. Place it to the
left . Add the same drop shadow.
 |
|
10. Open the disc
and copy and paste as a new layer, place it in the upper
right corner. Now, duplicate it, high light the
duplicated layer by clicking on it. Go to image, Free
Rotate, use the settings below. Repeat these steps,
duplicate, highlight the one you just duplicated and
rotate. Until you have 12 layers of the
disc, do not rotate the first one.
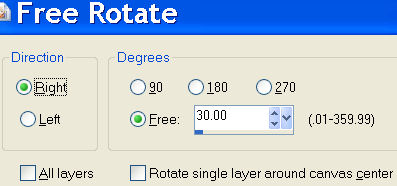 |
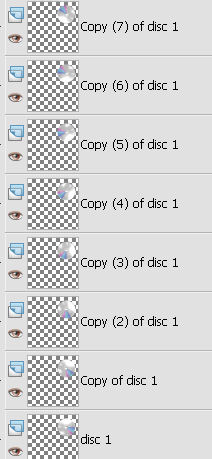
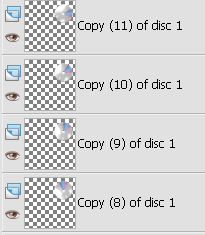
| 11. Below is an image of the layer
palette with the duplicated, rotated discs, in two
screen shots.
|
| 12. Before we animate, lets add a
mask, in the layer palette merge down the sky and the
gradient. Use the mask included in the zip or one of
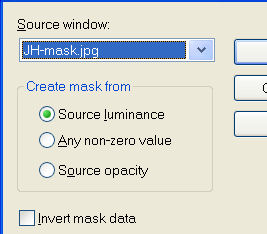
your own. Open the JH-mask.jpg and Minimize, make sure
you have the merged down layer active. Go to
layers in the tool bar, find New Mask Layer, from image,
when it opens use the setting below, merge group.
 |
| 13. Add the copy right if required
and your name. We are ready to animate, open Animation
Shop. |
| 14. In the layer palette, close
all layers of the disc, except the disc 1, got to edit,
copy merged, go to animation shop,edit click paste as new
animation., back to psp, close the layer disc 1, open
the next disc layer going up the palette. Go to edit,
copy merged and back to animation shop, now go to edit,
click the Paste After current frame. Repeat these steps
for each disc layer. |
| 15. You should have 12 frames in
animation shop, go to edit select all, next go to
animation, click on frame properties, set the display
time to 15. If you wish to resize the animation, got to
edit select all, go to animation, Resize animation, make
sure Maintain aspect ratio is checked. Save as a gif. |
|
I hope you have
enjoyed your self, and thanks for trying my tutorial. |